How To: Stop Incoming Calls from Taking Over Your iPhone's Entire Screen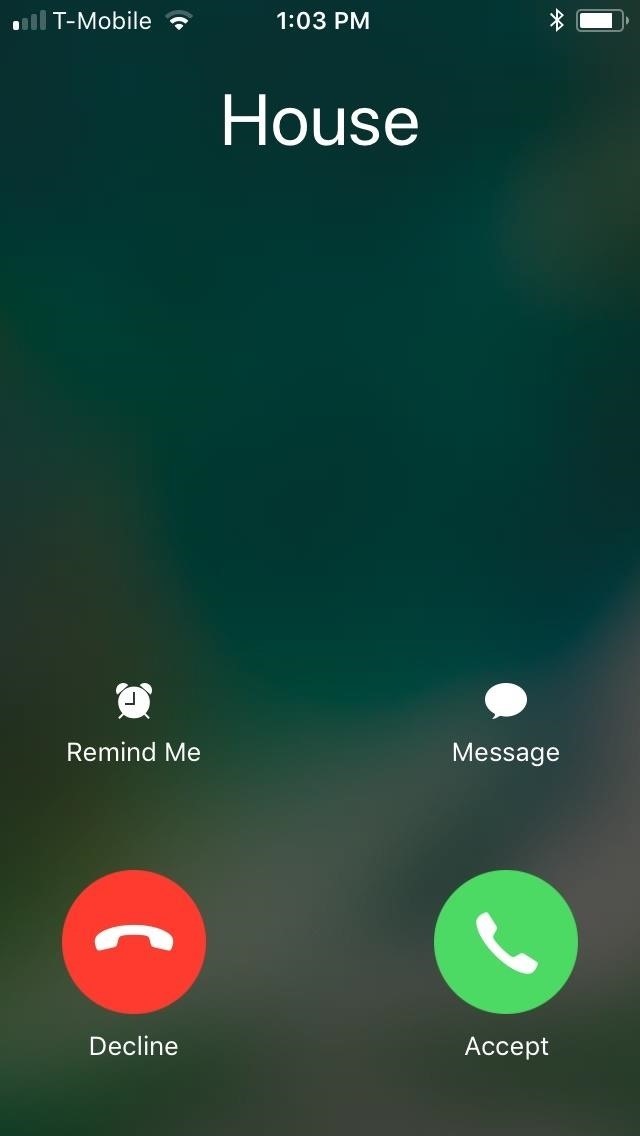
Incoming phone calls and FaceTimes, whether you want to answer them or not, will take over your entire iPhone's screen — no matter what you're in the middle of doing on the device at the moment. You could be browsing the web, playing a game, or chatting on social media. It doesn't matter, you'll get interrupted. But you don't have to put up with it anymore.If you have a jailbroken iPhone, there's a tweak that you can purchase right now to get rid of screen takeovers from calls once and for all. It's called CallBar X, created by Elias Limneos, and it adds a simple call bar interface to iOS that takes up less a fifth of your iPhone's screen space, allowing you to multitask during incoming calls. The bar is a less intrusive and distracting experience, and it lets you easily pick up where you left off once you answer or hide the call.Don't Miss: How to Jailbreak iOS 11 on Your iPhone — No Computer Required Full-screen takeover before the tweak (left) and small bar after (right). While CallBar X costs $3.99, its features go a long way towards enhancing your iPhone experience, which far outweighs its price. In addition, the tweak is incredibly easy to access and interact with once you've bought it, as we'll show you in more detail below.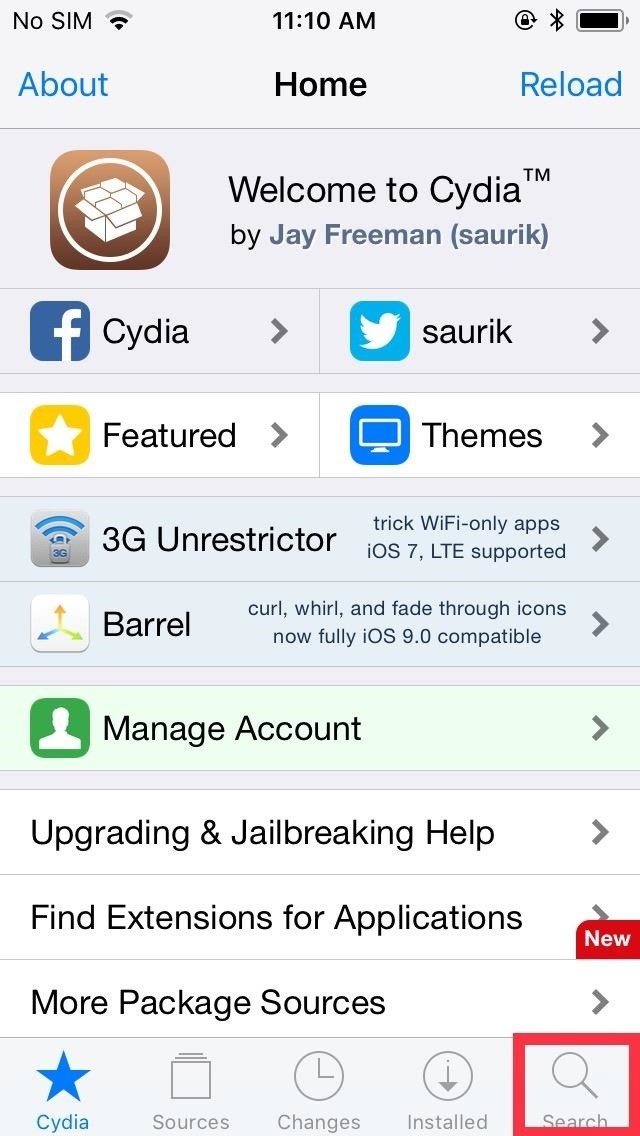
Step 1: Install CallBar XTo get started, open Cydia and tap on the "Search" tab. From there, type "callbar x " in the search bar, then tap on the tweak as it exactly appears in the results field. Once inside its Details page, hit "Install" in the upper right to download it. Next, tap "Confirm" in the upper right to finalize your selection. The tweak will now be installed onto your iPhone, so wait a few moments for the process to complete. Afterward, hit "Restart SpringBoard" to respring your iPhone and finish installing CallBar X.
Step 2: Purchase CallBar XAfter respringing, you'll instantly receive a toast notification on your home screen asking you to activate your CallBar X license, so hit "OK," and open the Settings app. Once inside, scroll down and select "CallBar X" to get into its preferences. You'll now need to purchase a CallBar X license to enable the feature. Tap on "Buy CallBar X" to proceed with the purchase. Once done, you'll automatically be transferred to a PayPal page, so enter your login credentials and follow the prompts to pay for the license.After successful payment has been made, you'll be taken to a page showing your payment details, along with your unique Transaction ID. This ID is very important, as you'll need it for future verification in the event that you need to reinstall the tweak for any reason, so save a copy of this page by taking a screenshot of it on your iPhone to store it in your Photos app. Please note that previous versions of CallBar that were purchased within Cydia itself cannot be applied to CallBar X, so you'll have to buy a new license entirely to use the tweak. Thankfully, paying for CallBar X will only be a one-time deal, as the developer has confirmed that your license will carry over to future versions of the tweak, including iOS 12 — once a stable jailbreak for it becomes available.Don't Miss: This Tweak Gives You iPhone X Gestures on Any iPhone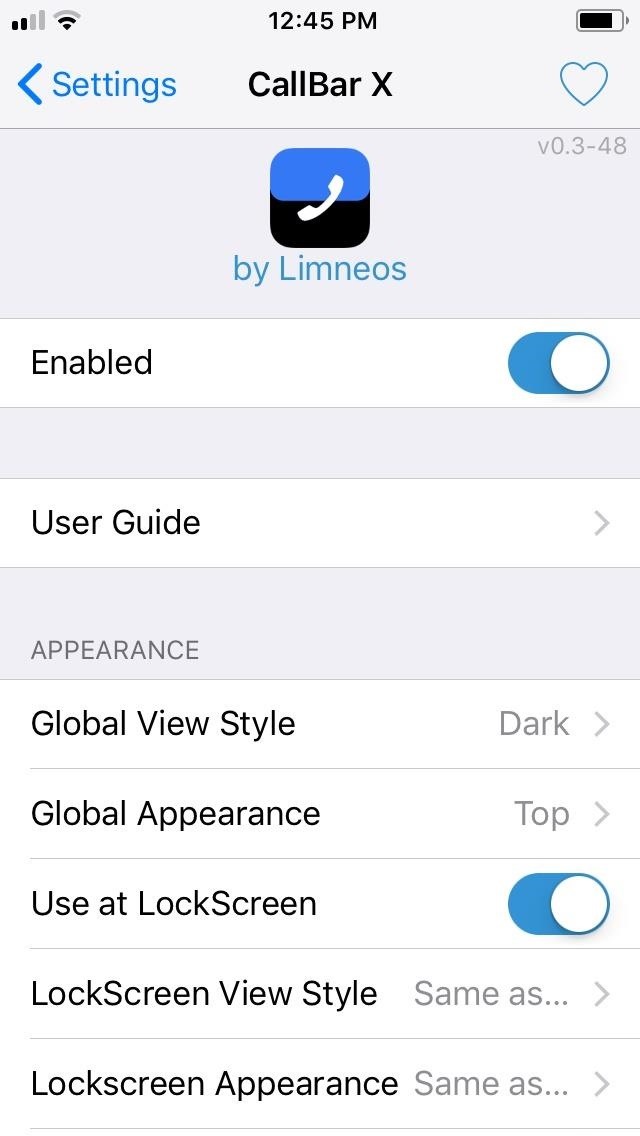
Step 3: Enable CallBar XAfter completing payment, you'll now be able to access the CallBar X in full, so access it's settings as highlighted in the second step, and tap on the toggle next to "Enable" to turn the tweak on. From there, you'll be greeted with a slew of features that you can enable, ranging from setting the call bar on the top or bottom of the screen to using the tweak for FaceTime calls — and so much more. In addition to those settings, CallBar X lets you set a custom theme for a more personalized look by tapping on "Global View Style." Besides the default Dark theme, the tweak lets you choose between "Light," "Concept X (Curved)" and "Concept X (Flat)" themes.Just bear in mind that while you can freely set both the light and dark themes to appear along the top and bottom of the screen, the two Concept X themes can only be set along the bottom. CallBar X also gives you options to instantly access your call bar tweak by performing various gestures on your iPhone's status bar. To do so, hit "Activation Methods" from the tweak's Settings page, and tap on any or all three toggles to give you the ability to open CallBar X either by double-tapping or swiping left or right on the status bar. Regardless of what options you've set, CallBar X instantly applies them without the need to respring your device, so you can try each setting on the fly and fine-tune it until the tweak works exactly how you want it to.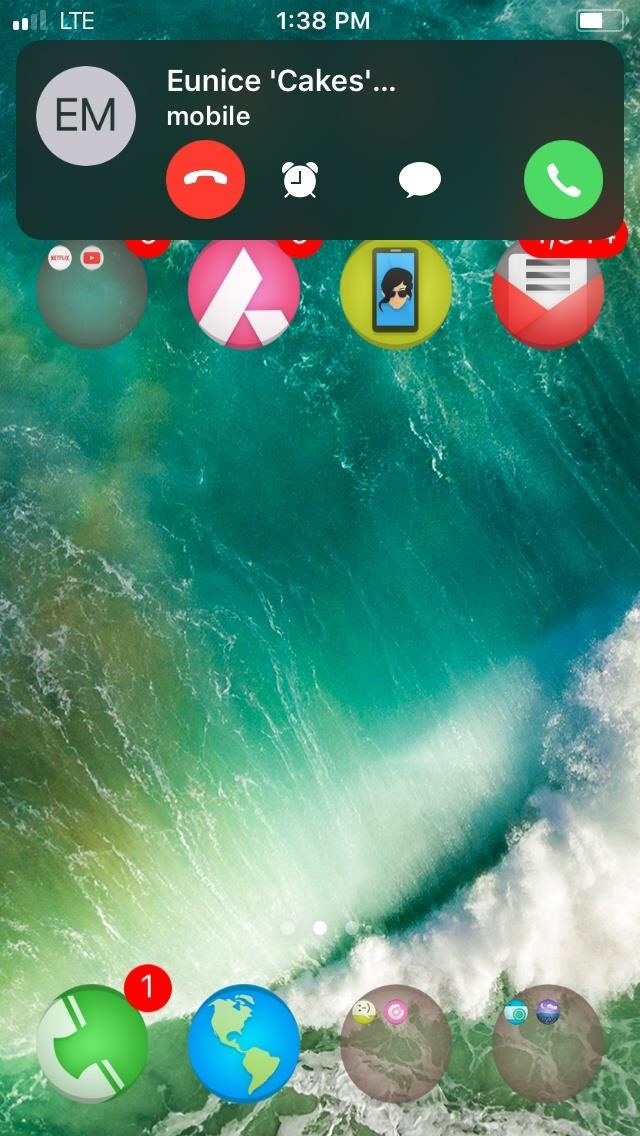
Step 4: Enjoy CallBar XWith CallBar X enabled and set according to your preferences, any incoming and outgoing (if enabled) phone calls will appear as a small, unobtrusive call bar that you can tap on to further expand for more options, such as enabling the speaker function or pulling up the dial pad. If you get an incoming call while you're doing something important, swipe up on the bar to hide it, which will turn your status bar green indicating a call is still trying to get through to you. You can tap that bar to bring up the call bar again. Also, if you're playing a game or watching something in landscape mode, note that the call bar is locked into portrait mode, so it'll be sideways if you're in landscape orientation. The tweak functions much in the same way for FaceTime Audio and Video, with the latter featuring added windows on both sides to show videos of you and your contact. And if the video call is too small, perform a double-tap on the call bar to enable full-screen mode to see your contact more clearly. Don't Miss: More Cydia Tips & Tricks for All Your Jailbreaking NeedsFollow Gadget Hacks on Facebook, Twitter, YouTube, and Flipboard Sign up for Gadget Hacks' daily newsletter or weekly Android and iOS updates Follow WonderHowTo on Facebook, Twitter, Pinterest, and Flipboard
Cover image, screenshots, and GIF by Amboy Manalo/Gadget Hacks
Follow these step-by-step instructions to download pictures from camera to computer in Windows Live Photo Gallery. Step 1: Whatever you store your pictures on, insert this into your computer. Many people take the memory card straight from their camera and insert it into a slot in the side of their computer.
How to download Windows Photo Gallery | Digital Unite
2) Under the Account Preferences section click Delete your account or services. 3) From here, you have two options: Delete products (such as Gmail, YouTube, etc.) or Delete Google Account & Data. Since this is a guide on how to delete everything from Google, we'll select Delete Google Account & Data. 4) Google will ask you to re-enter your
How to Delete Activity History of Your Google Account on Android
How To: Get "Anywhere" Gesture Support, Themes, Call Counts, & More with Blinq for Android Action Launcher 101: How to Use Quicktheme to Make Your Home Screen Match Your Wallpaper Nova Launcher 101: How to Add Any Widget to Android Oreo's Expanded Dock
Theme Your iPhone's Home Screen with Falling Snow for the
Wonder How To is your guide to free how to videos on the Web. Search, Browse and Discover the best how to videos across the web using the largest how to video index on the web.
How to Turn Your Furby Evil - YouTube
Sent an email by mistake? Find out How To Recall an Email in Gmail. Unsend the message you sent by mistake in a few easy steps.
How To "Unsend" An Email in Gmail - YouTube
The Barnes and Noble Nook Simple Touch with Glowlight is the second iteration of their Simple Touch e-reader line. With the advent of any new device the previous generation often goes down in price.
How To: Get iOS 12.1's New Emojis on Any Android Phone Siri Exploited—Again: How to Bypass the Lock Screen in iOS 8 (& How to Protect Yourself) How To: New iOS 9 Flaw Exposes Private Photos & Contacts—Here's the Fix News: Apple Just Released the First iOS 12.1.1 Beta to Developers
Vision Hack: How to See Clearly Without Your Glasses or
DIY Bluetooth Speaker: Meet the PartyBar™! Make a wireless speaker, loud enough to fill an entire room! With a budget less than $15, you can have your own Bluetooth speakers made from scratch materials! It's slick, stylish, descent and most of all it's compact and fits
How and why to use Bluetooth on your Windows 10 computer
Get the Pixel Experience with One Simple Mod [How-to] I'll be showing you how to install a ZIP that gives you a bunch of the Pixel's features in one shot. Google Pixel Experience
How to Install Android Q Beta on Any Google Pixel Phone
Remove all; Disconnect; The next YouTube Premium Loading Get YouTube without the ads. Working Skip trial 1 month free. Find out why Close. How To Remove Icon Labels Ios 10 No Jailbreak
Is there a tweak to remove/hide the folder name in the folder
How to use SpyBubble? SpyBubble can track Snapchat on iPhone without jailbreak and this particular app and service is easy to install and configure for the first time. All you need is physical access to the target device for few minutes to install SpyBubble for the first time and then you can do everything remotely with the help of web portal
How To Fix Snapchat "Could Not Connect " Error On - Jailbreak
Updated January 2019 - Rare to find smartphones which offer not only great specs, user experience, and astounding music experience. Smartphone manufacturers are pushing the specs up with each new model but music experience and earphones supplied with most smartphones are pathetic for music lovers.
The best phones for music | TechRadar
As others have stated, you can use Ctrl-Tab and Ctrl-Shift-Tab to move forwards and backwards through the tabs on most browsers.. Another idea, which I find much easier on the fingers, and works in Firefox and I think Chrome (not sure of others) is to use Ctrl-PgUp, and Ctrl-PgDn to go through the list of tabs you just need to ensure your tabs are next to each other for it to work (just
0 komentar:
Posting Komentar